Having doubts? We offer free returns within 90 days of purchase. Final sale items excluded.

Translation missing: en.general.currency.dropdown_label

0 Cart
Added to Cart
    You have items in your cart
    You have 1 item in your cart
      Total

      Answers to Your Self-Tape Questions: Part One

      This article was originally posted on July 22, 2021.

      Self-tapes are here to stay, and for those new to recording their own auditions it can be a confusing and sometimes frustrating territory to navigate. I've compiled a list of a few of the questions I've received followed by my answers, and will be answering more in later blog posts. If you have a self-tape question you'd like answered, reach out on social media @shoptheatrik, or email hello@shoptheatrik.com


      Do I have to have a reader or can I pre-record the other characters’ lines and play them from my phone?

      A reader who is there with you in person is always your best option. It gives you someone to play off of in the scene. However, there might be times when having a reader there with you is not possible. You could pre-record the other characters’ lines but then you’re likely stuck constantly hitting pause and play during your take. It’s hard to concentrate on acting when your focus is on cueing up the other lines, unless you time your recording just right that you can play it straight through and still get your lines in. An alternative is to reach out on social media - there are Facebook groups specifically for actors looking for readers. Additionally, there are a number of apps designed for this very purpose. A quick internet search should lead you to a healthy list. You can also check out this Backstage article “13 Apps Every Actor Should Use.”


      For musical auditions, should I sing a cappella or try to find an accompanist?

      Unless your audition instructions specify otherwise, you’ll likely want to have accompaniment. You could certainly hire someone to play the music for you live, or you could record them playing it and make your self-tape without them present. However, finding an accompanist is not always possible. Playing the music from your phone is totally acceptable and pretty standard for a self-tape. If the music isn’t provided by the casting office, you can likely find it on the internet.


      Is light from a window sufficient?

      Natural sunlight is great and usually looks good on camera. However, you shouldn’t rely on a window as your sole lighting component. What if the sun moves or is covered by clouds in the middle of your recording? The lighting will change on camera and might not be consistent throughout your audition. What if the sun is so bright you have to squint to get through your audition? Or what if you have to record at night and don’t have the benefit of natural sunlight? You’ll want to invest in a good lighting kit to ensure you can be clearly seen on camera.


      How do I prevent shadows from showing up on my backdrop?

      Shadows appear when you are standing too close to your backdrop. Moving closer to camera and further away from the backdrop will reduce shadows. You can also adjust your lighting device to a different position to help prevent shadows.


      Are “ring light eyes” really a big deal?

      Yes. If you are using a ring light, depending on how it’s positioned the ring of light can completely cover the irises, so the actor’s eyes appear to be “glowing.” If this happens it becomes difficult for a director to focus on the performance because, as you can imagine, glowing eyes can be rather distracting (not to mention creepy). If you use a ring light, try turning it around and bouncing the light off a white wall or reflector screen, or adjusting the height of the light so it’s not directly centered on your face.


      Do I need a backdrop or can I use a plain wall?

      A wall works just fine if you can paint it a light color that flatters your skin tone. White or beige walls usually don’t look great on camera and are often unflattering for the actor.


      What color backdrop is best to use?

      You should use a color that is flattering for your skin tone. Light blue tends to look good on all skin tones, but light gray and light pink are also great options for some. Avoid yellows and greens - these colors tend to make your skin look yellow or green on camera. Many actors use a dark blue backdrop, as it is widely available on such sites as Amazon, but the color isn’t flattering for everyone. You should also avoid colors that are too bright - you don’t want your backdrop to distract from your performance. Muted, light colors work best to ensure the focus remains on the actor’s performance and not what is happening in the background.


      Is an external microphone necessary or will the mic from my phone suffice?

      While it’s fine to use your phone’s microphone to record your sound, an external mic will enhance the overall quality of your audition. Lavalier microphones are great because they are small and can clip onto an actor’s clothing. The sound is clearer than a phone’s mic and it is easier to cut out the background noise.


      Keep those questions coming! Confused about how to edit your takes and send the file? Unsure what to do when the scene includes a kiss? I'll be answering more of your self-tape questions in future blog posts.

      The Art of the Slate

      This post originally appeared here in October of 2020. As someone who coaches and tapes a lot of actors, one of the most common things I hear over and over from them is, "I feel so weird introducing myself." Now that self-tapes are the primary form of initial auditions, knowing how to strike an appropriate first impression has never been more key.


      "Hello, my name is " nametag

      It’s amazing how the words, “Hi, my name is _____” can become so nerve-wracking and angst-ridden once the camera is rolling. Slates are a vital part of an audition, though many might think of them as more of a necessary evil. So why are slates so difficult? To the chagrin of many, standing still and introducing yourself while exuding charm and trying to appear oh-so-perfect for the role can be an anxiety-inducing challenge. This feeling is magnified when you are trying to self-tape and don’t have the energy from the director/producer/casting associate in the audition room. The good news is slates don’t have to be terrifying, and the more you do them the easier they become.

      There are two schools of thought when it comes to slates. The first is that you should slate as yourself. In other words, introduce yourself as you, not the character you are trying to play. Allow your own personality to come through in those first few seconds before you launch into the scene. The second school of thought is that you should slate in character. So which do you choose? Different casting directors will have different preferences, and sometimes these preferences change depending on the project.

      Sometimes you can determine what kind of slate you should do based on the information you have about the project. If you are doing a general open call as a way to introduce yourself to a casting office, it’s probably a safe bet to go with the first school of thought. Be yourself. You’ve probably heard the phrase “You’re auditioning for the room, not the role.” An open call allows casting directors to meet actors they haven’t worked with yet, and they want to know what it is they’ll get if they call you in for a project. They want to get to know YOU.

      If, however, you’re auditioning for a director or producer who has auditioned you before and already knows you or your work, then slating in character is perfectly acceptable and possibly even preferred. This is especially true if the scene is particularly emotional or dramatic (it would be rather jarring for an actor to walk in and slate with a smile and bubbly personality and then launch into a tearful funeral scene). Use your best judgment. To that note, you also don’t want to scare those that are in the audition room. If the role is an angry, loud-mouthed character who is constantly shouting, that doesn’t necessarily mean you need to yell your name right into the director’s face.

      If you’ve done the work and are mentally prepared for the scene before you walk into the audition room, the slate will come naturally. Often, I find the most organic slates come from a combination of the two aforementioned options. If you get yourself into the mindset of the character before you walk into the audition room, you’ll set the right tone in those first few seconds before you begin the scene.


      How to Edit, Compress and Send Your Self-Tape File

      You've done it; you've moved furniture around to clear a space, positioned your camera *just right* to make sure you've framed yourself correctly, adjusted your lighting to avoid shadows, and done as many takes as needed to feel you've given it your best shot. In other words, you've successfully finished recording your self-tape audition. Now what?

      Here is a step-by-step guide on how to edit, compress and send your self-tape file using iMovie and WeTransfer. These are not the only programs that can be used for this task but are the ones I'll focus on for the purpose of this article.


      1. Import your clips into iMovie

      Select the library you wish to use for your self-tapes (in this example I'm using "Tapings"), then from the File menu select New Event.

      iMovie - file menu - new event

      You can rename the event (I've chosen Audition 1). With the name highlighted go to the File menu again and select New Movie.

       iMovie - file menu - new movie

      You can import your clips using an SD card or by selecting them from your desktop.

      import clips


      2. Take out the background noise

      This is a simple step that will improve the quality of your sound. Select all your clips by clicking on one and holding down the shift button as you select the others. Then click on the sound bars located in the upper right of your screen. Click the box next to "Reduce background noise" and slide the slider to 100%.

      reduce background noise in iMovie


      3. Create Your "Movie"

      Drag your clips down to the bottom half of the screen in the order you'd like them to appear. You can also reorder them after you've dragged them down by simply clicking on the clip and moving it.

      drag your clips to create your movie


      4. Trim the ends of your clips

      You will likely have a couple of seconds at the beginnings and/or ends of your clips that you do not want to include as part of your audition (maybe you were getting into place after hitting record or you needed a few seconds to breathe before starting the scene). You can trim these by positioning your cursor at the beginning or end of the clip, then clicking and dragging to the desired start/stop mark. Do not worry if you cut too much! You can always select "Undo" from the edit menu, or position your cursor where you need to edit the trim and extend the length.

       trim your clips


      5. Rename the file

      Most self-tape instructions will be specific on how they want the file named. If not, it's safe to label it with your name and the name of the role. To do this, click on "Projects" in the upper left corner of your screen.

      renaming a file in iMovie

      Select a file name and click OK. I'm using FirstnameLastname_ROLE.

      renamed file iMovie


      6. Compress the file

      Click the share button in the upper right corner of the screen (if in the Project screen, just click on your project and then the share button). Select File. Even if you are given instructions to email the video, post to Vimeo, etc., choosing File saves the video to your desktop, from which you can create a link, upload it to EcoCast, email it, etc.

      share the video

      Choose your resolution and compression quality, click Next and then click Save.

      choose compression quality


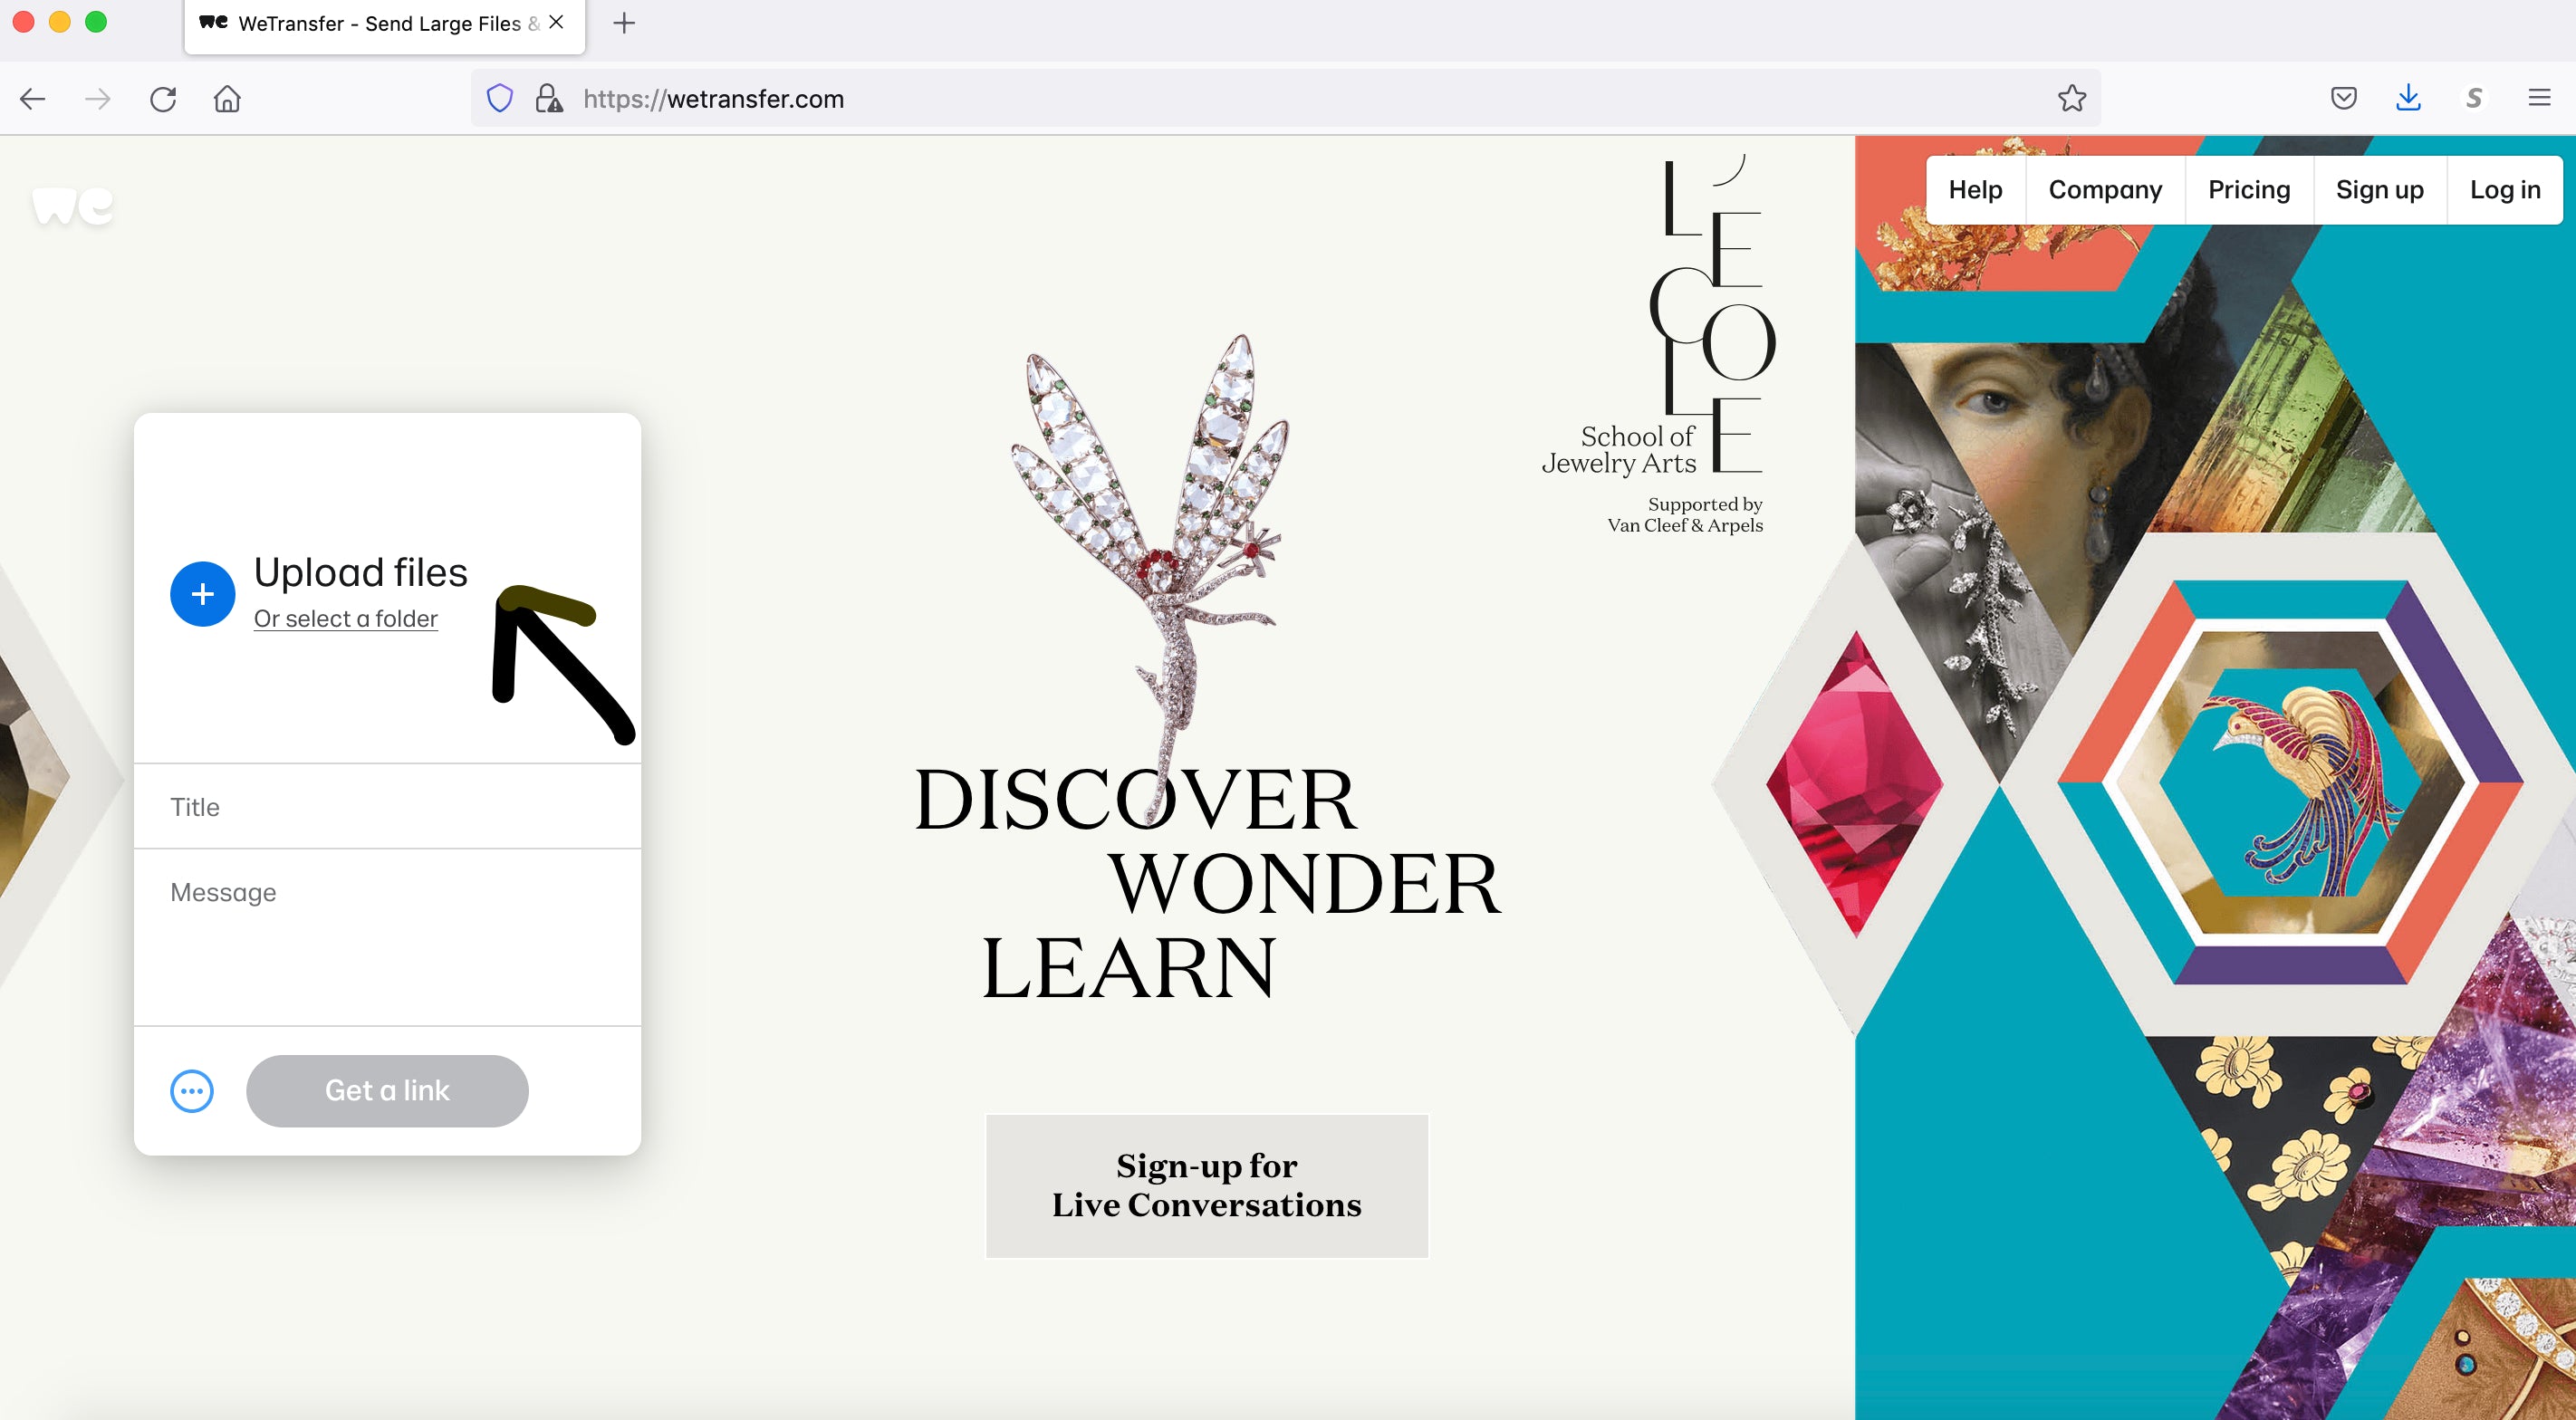
      7. Create a shareable link in WeTransfer

      If you are uploading to a service such as EcoCast, you can upload the video directly from your desktop. However, if you need to send a link to your agent, you can create one using WeTransfer. Go to WeTransfer.com and click "I just want to send files."

      send file using wetransfer

      Click Upload Files and select your file name from the list.

      click upload file

      Click Get a Link.

      get a link WeTransfer

      Once your link is ready, click Copy Link. Now you can share the link with your agent, manager, or whomever might require it.

      By following these steps you'll be able to edit, compress and send your audition files like a pro. Still have questions? Send an email or reach out on social media and I'd be happy to help.

      3 Tricks to Ease Audition Anxiety

       Casting sign

      Scenario: You just received a notice from your agent for an audition. The sides are four pages for a new Netflix show and the audition is in two days. Normally, four pages wouldn’t be such a big deal. You’d spend the next 48 hours trying to get off book, break down the beats of the scene, and then forget about the audition an hour after you left the casting office.

      But this is different. Because the show was created by her, your idol, your “OMG if I ever get to work for her then I’ve definitely made it” idol. And the role is perfect for you. It’s like she created the part with you in mind, despite having never met you before. So you begin to freak out. You start to hype this audition up like it can make or break your career.

      Walking into an audition room is always going to be a bit nerve-racking, no matter how experienced you are. Being as prepared as possible - familiarizing yourself with the script, doing your scene work, developing strong character choices - will naturally ease some anxiety. But there are tricks you can play on your brain to help calm your nerves during those few minutes of an audition. That’s really all it is - just a few minutes out of your day. You only need a few minutes of confidence out of the entire day and then you don’t have to think about it anymore.

      These might not work for everyone, but here are three specific tricks I used repeatedly as an actor when I had an audition:

      1. Pretend the role has already been cast with another actor.
      There is a common phrase actors hear often from casting directors: “We’re rooting for you. We want you to be good!” It’s meant to ease an actor’s nerves, to let them know the casting director is on their side, but too often it ends up having the opposite effect. Hearing a casting director say “we want you to be good” puts unnecessary pressure on you, the actor, as though you don’t already have enough to worry about. However, if you pretend the role has already been cast, what do you have to lose? I don’t mean you should tell yourself, “Oh, they’re probably going to go with so-and-so,” I mean actually tell yourself, “They’ve already cast so-and-so in this part.” Telling your brain there is no way you can get the part in turn tells your brain there is no way you can fail.

      2. Make yourself unavailable for the project.
      I don’t mean actually make yourself unavailable - what would be the point in that? You just want to trick your brain into thinking you are unavailable for the project. Case in point: I was planning to visit my family who lived out of state, but I hadn’t yet picked which dates I would travel. An audition came up for a lead in a play that I really wanted. It was a cool script and I’d get to work with fun people, plus it was the lead, you know? So I chose to book my trip for the opening week. I was telling my brain this audition didn’t matter because I wasn’t available for the project anyway. I didn’t list the trip as a conflict (obviously) knowing I could reschedule my plans should I land the role. However, telling my brain I wasn’t available freed me from placing too much emphasis on this one audition. It also allowed me to walk into the audition room with an aren’t-you-sad-you-can’t-work-with-me attitude - not in a cocky way, but with an air of confidence. I booked the role.

      3. Act as though you’ve already been cast in the role.
      Instead of following the first trick I list where you pretend the role has been cast with another actor, you can try the opposite. Regardless of whether it’s an initial audition or a callback, telling your brain you’ve already been cast is yet another way to take the pressure off. When approaching an audition I often hear actors say, “I don’t want to mess this up.” How can you mess up if you’ve already booked it? Believing you’ve already landed the role can provide a much-needed boost of confidence.

      Most audition rooms are closed for the time being due to the pandemic, forcing casting sessions to be held online. These same tricks still apply, only now you get to use them from the comfort of your own home. And when it comes to self-tapes you can REALLY have some fun. Think about it: you get to try the audition as many ways as you want. Mess up a line? Just re-record. Want to try something that seems like it could be a little risky? Try it! Watch the playback and see how the take reads. Self-tapes, though they can be annoying and even frustrating at times, are incredibly freeing and an excellent learning tool.

      While nothing can substitute for preparedness, using brain tricks that take the pressure off can help you get through what seem to be “make it or break it” auditions, no matter how nervous or anxious you are. Maybe you already use other psychological techniques to calm anxiety during auditions. I’d love to hear about them! Email us at hello@shoptheatrik.com or reach out via Instagram, Facebook or Twitter @shoptheatrik.  --Kate McCoy